
DIY Copper Snake Ring. Free wire wrapping tutorial
Difficulty: easy
Materials: copper wire, copper beads, round nose pliers, torch, engraver, polish paste, citric acid
___
In this tutorial i want to share with you the technique of creating a dimensionless wire snake shape ring.The snake turns out to be quite unusual, in reality it looks interesting, and everyone can do it with their own hands from wire with a a little patience.
So, you will need:
- copper wire with a diameter of 1.3 / 0.8 / 0.3 mm
- some bead or bead crumb
- 4 copper beads with a diameter of 2 and 3 mm
- wire cutters
- torch
- surface for soldering
- round nose pliers
- engraver (or needle file)
- anvil
- sandpaper
- polishing paste.
Step 1. Making the base
Take a piece of the thickest wire. In this case, a diameter of 1.3 was used, but you can use the range between1-1.6 mm.
Step back from the edge a couple of centimeters and with the help of an engraver or a needle file, make a cut by about 2/3 of the thickness. It will be easy to bend the wire and solder the tip.

With the help of round-nose pliers, bend the edges and solder copper just like in the picture below. In this manual i used soft copper solder paste.

After soldering, sharpen the tip with an engraver or needle file, and grind it well with sandpaper.

Take a cylindrical object and wrap the wire, forming a ring shank.

With the help of round-nose pliers, bend the tail in a some waves shape.

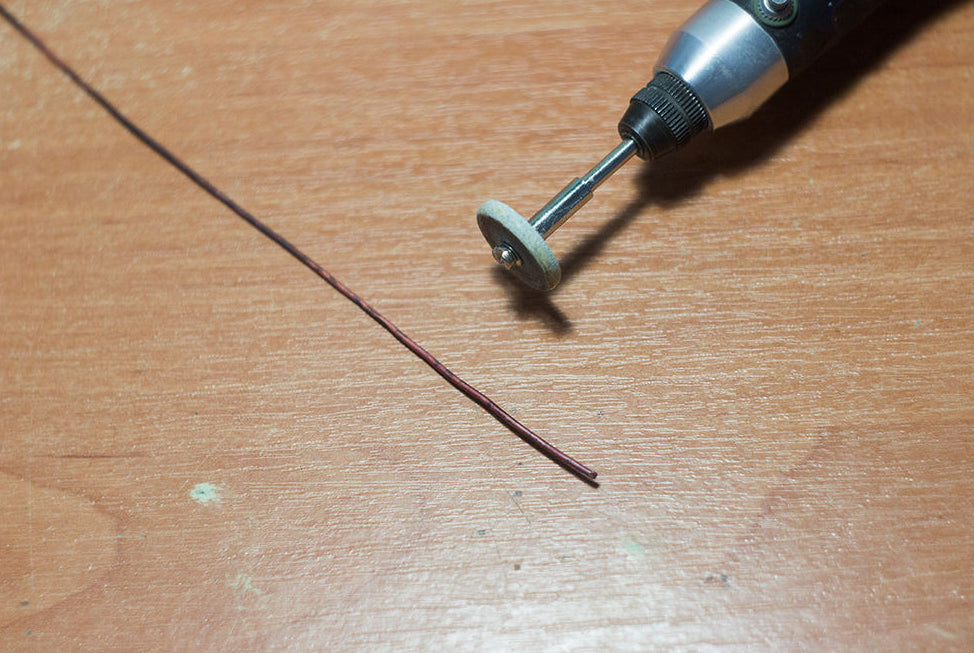
Take the engraver (or needle file) and sharpen the inaccurately bitten tip of the tail. For convenience, it can be slightly bent to the side.

Carefully pass along the tip with sandpaper and wrap it with round-nose pliers into a spiral.


Take a small hammer and beat off the tail. Again, carefully use sandpaper to be sure that there are no dents or bumps left after the hammering.


Step 2. Making face
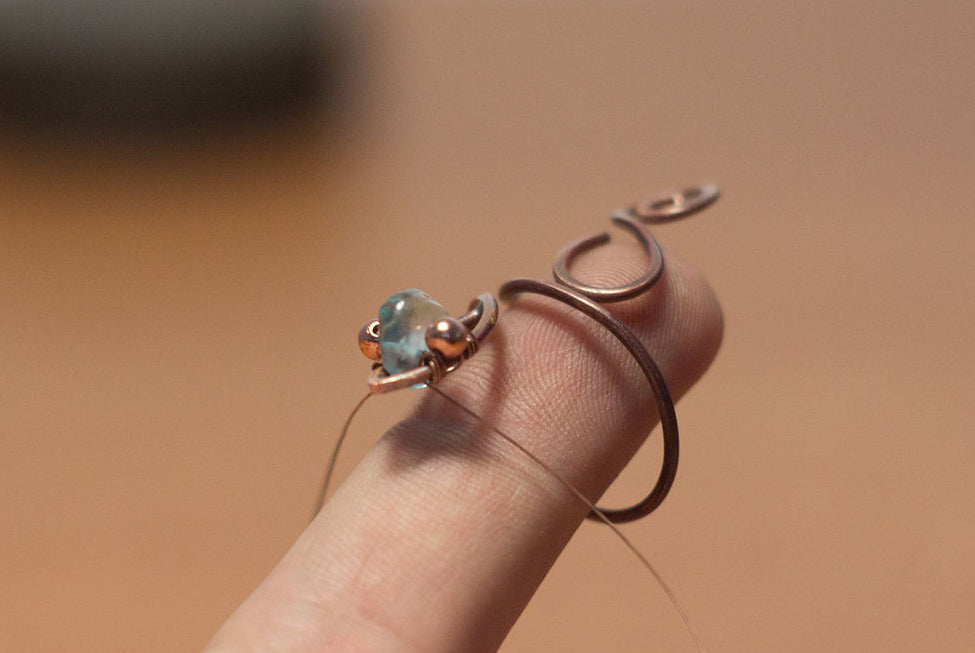
Take a bead that will fit into a head. I used some freeform shaped small glass bead

After the stone is fixed, add two copper beads (eyes) with a diameter of 0.3 mm from the both sides of bead.
Then we take a small piece of wire and, using a fold cut as in step 1, we form a workpiece, as in the photo below. It will cover the stone and eyes from above.

Repeat the steps with soldering and sandpaper grinding.

Connect this piece to the snake head.

After fixing, bend it, as pictured below.


Take smaller copper beads, add them next to the previous from both sides of the head. Cloze space that lefted by wrapping 2x2 using 0.3 mm wire.


Step 3. Wraping the base
Take second piece of wire with a diameter of 0.8 mm. Sharpen the edge, grind it within a sandpaper and turn into a small spiral.

Put this spiral under the upper element at the head and attach it to the base.

Here comes my favorite part of the creation :)
Take a long piece of thin wire (0.3 mm) and start connecting two wires together with a 2x3 wrapping.


Wrap it to the very end.

When we reach the tail, cut off the excess and sharpen the tip, put it inside a large spiral.

The snake is almost ready. Throw your snake to lemon acid for removing carbon deposits, oxides after soldering, and so on. Then polish it by some polish paste that you have.

Patinate your ring with liver of sulfur, dry it and and use hard fiber to make it shiny.

Enjoy the result of your creation. I think you have made a beautiful wire wrapped ring!)


If you discover this free wire wrapping ring tutorial useful, we'll be very grateful for your donate to Pay Pal: Artarinaag@gmail.com
Even the smallest donation can help us get through the hell of the war here in Ukraine.
If you want to support us some other way, feel free to share any of our item, tutorial or links from this website in social networks or with your friends.